Unless you are a graphic designer or have worked in the printing industry you have probably never heard of bleed. If so, it is time to learn something new as bleed is a vital part of printing and is the key to making sure your artwork looks the same when printed as it does on screen. In this guide we will explain all you need to know about bleed to help you create print ready perfect artwork.
What is bleed?
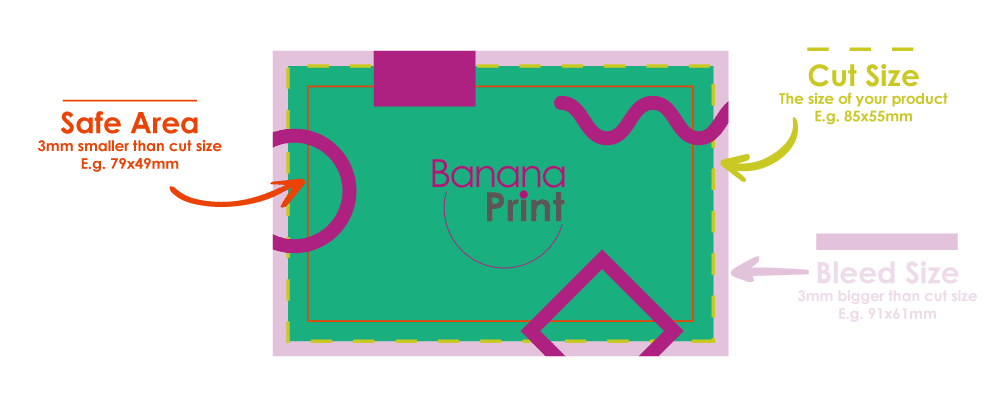
Bleed is the extra space around your artwork that will be cut off after printing.

Why do you need bleed?
When we print your artwork there are multiple copies on a large sheet which is then cut down to size using a guillotine. Although we try our best, the guillotine isn’t completely accurate so it may cut a few millimetres out. To make sure your artwork reaches the edge of the page we therefore need you to extend your artwork to provide room for this movement. If there is no bleed your artwork may end up having a thin white border.
What size is bleed?
Bleed size can differ depending on the product but usually it is an extra 3mm on each side of your design. For example, a standard business card is 85x55mm at cut size so with bleed added it is 91x61mm. See the table below for bleed sizes for all products.
How do you add bleed?
The easiest way to add bleed is when you set up your document. When selecting the size in document setup add a 3mm bleed to each side. If you have already created your artwork on an editing software, you should be able to go back to the document setup to add bleed on and then all you need to do is extend your background colour and/or images to fill the extra space.
If you are creating your artwork on Microsoft Word, PowerPoint or Adobe Photoshop there isn't an option to add bleed. You will therefore need to make your document/image 3mm bigger on each side at the start and add a guide so you know where the cut line is.
Don’t forget about the safe area!
In addition to bleed, you need to make sure that all the important elements of your artwork are within the safe area. The safe area is the opposite to bleed and is 3mm smaller than the cut size on each side. Please refer to the table above for safe area dimensions.
Need more help?
We hope you are now all clued up on bleed but if you are still feeling confused, don’t worry as our team of graphic designers will check your artwork before it is printed. We also have a free online design studio that already has guides in place to help make sure your artwork is print ready. The green dotted line represents the safe area, the red dotted line represents the cut line and the black line represents the bleed area. Good luck and get creating!
